Single sign-on is an authentication method that allows users with a domain account to log on once to a client computer by using a password, and then gain access to remote servers without being asked for their credentials again. See more details here for Windows Server 2008 and here for Windows Server 2008 R2.
On the client-side SSO are currently available for Windows XP with SP3, Windows Vista and Windows 7.
Configure SSO on the server-side
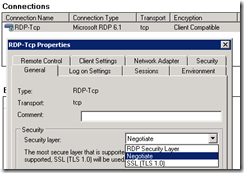
To configure SSO on the server-side (Windows Server 2008 Terminal Services or Windows Server 2008 R2 Remote Desktop Services), set the option “Security layer” to either “Negotiate” or “SSL (TLS 1.0)”:
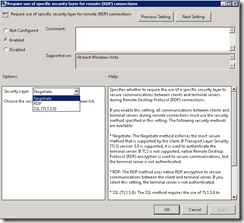
Best practice would be to configure this in a common GPO for all Remote Desktop Services servers in the domain:
This setting resides under Computer Configuration->Policies->Administrative templates->Windows Components->Terminal Services->Terminal Server->Security.
Configure SSO on the client-side
Using a common GPO would also be the best practice to deploy the client settings needed for SSO to work.
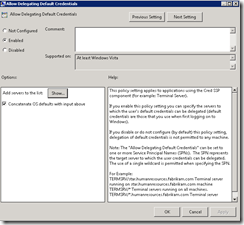
The “Allow Delegating Default Credentials” resides under Computer Configuration->Policies->System->Credentials Delegation:
The “Allow Delegating Default Credentials” resides under Computer Configuration->Policies->System->Credentials Delegation:
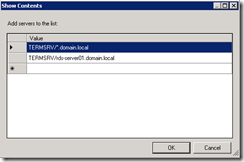
Enable “Allow Delegating Default Credentials”, press the “Show”-button and either specify the domain pre-fixed with * to allow delegation to all servers in the domain, or specify specific servers:
Next, create a RDP-file and deploy this file to the client computers.
Before deploying the file, open it in a text editor, e.g. Notepad, and add the following line: enablecredsspsupport:i:1
This will enable SSO for the RDP-file.
Before deploying the file, open it in a text editor, e.g. Notepad, and add the following line: enablecredsspsupport:i:1
This will enable SSO for the RDP-file.
I would also recommend to sign the RDP-file with a Code Signing certificate. This can be accomplished using the utilityrdpsign.exe:
Sample signing:
When a RDP-file are signed, the following will be added to the bottom of the file:
signature:s:AQABAAEAAADBCgAAMIIKvQ……..
More Here
Courtesy:http://blog.powershell.no/2009/12/25/single-sign-on-to-remote-desktop-services/


hmmm i understand thanks for sharing
ReplyDeleteNepali Sex Videos
Punjabi Sex Videos
Thanks for Sharing
ReplyDeleteIot Online Training
Itil Interview Questions
Salesforce Interview Questions
Msbi Interview questions
Salesforce Interview Questions
C Interview Questions
Nice Interview Questions
ReplyDeletesap partner companies in bangalore
sap implementation companies in bangalore
sap partners in india
aws staffing
Hello There,
ReplyDeleteSmokin hot stuff! You’ve trimmed my dim. I feel as bright and fresh as your prolific website and blogs!
I'm new to the world of programming and I am really under pressure to learn
python at the moment for a mature student college course. So im looking for help on how to get python pandas installed on ubuntu 16.04, specifically pandas datareader. I might need more help later too, to get my head around this. I have no programming experience and very little linux experience.
I'm doing the basic introduction on python and stuck on the second part.
import pandas_datareader.data as web
Thank you very much and will look for more postings from you.
Thanks a heaps,
Anjali
Hello Mate,
ReplyDeleteAllow me to show my gratitude bloggers. You guys are like unicorns. Never seen but always spreading magic. Your content is yummy. So satisfied.
I a beginner trying to practice after completing the code academy course. Right now im trying to do a guess a number game.
This is the instructions
The Goal: Similar to the first project, this project also uses the random module in Python. The program will first randomly generate a number unknown to the user. The user needs to guess what that number is. (In other words, the user needs to be able to input information.) If the user’s guess is wrong, the program should return some sort of indication as to how wrong (e.g. The number is too high or too low). If the user guesses correctly, a positive indication should appear. You’ll need functions to check if the user input is an actual number, to see the difference between the inputted number and the randomly generated numbers, and to then compare the numbers.
This is my code
Python Code: (Double-click to select all)
from random import randint
def guess(x):
it = randint(0, 101)
if x == it:
print("You got it!")
elif x > it:
print("too high")
else:
print("too low")
print guess(50)
Very useful article, if I run into challenges along the way, I will share them here.
Regards,
Morgan